go pprof性能分析
1 pprof数据采样
pprof采样数据主要有三种获取方式:
- runtime/pprof,手动调用runtime.StartCPUProfile runtime.StopCPUProfile等API生成和写入采样文件,灵活性高
- net/http/pprof,通过http服务获取Profile采样文件,适用于对应用程序的整理监控,通过runtime/pprof实现
- go test,go test -bench . -cpuprofile prof.cpu生成采样文件,适用于对函数进行针对性测试
2 runtime/pprof
runtime/pprof提供各种相对底层的API用于生成采样数据,一般应用程序更推荐使用net/http/pprof,runtime/pprof的API参考runtime/pprof或http pprof实现。
2.1 cpuprofile
我们可以使用gotest的命令行参数-cpuprofile和-memprofile,导入runtime/pprof,在Hundt's benchmark programs添加如下代码:
var cpuprofile = flag.String("cpuprofile", "", "write cpu profile to file")

func main() {
    flag.Parse()
    if *cpuprofile != "" {
        f, err := os.Create(*cpuprofile)
        if err != nil {
            log.Fatal(err)
        }
        pprof.StartCPUProfile(f)
        defer pprof.StopCPUProfile()
    }
    ...
如设置了cpuprofile参数,CPU profile则会将Profile结果保存至此文件;最后需要调用StopCPUProfile,确保在程序退出前,所有数据都写入文件。
./havlak1 -cpuprofile=havlak1.prof
go tool pprof havlak1 havlak1.prof
(pprof) top10
输出结果如下:
Showing nodes accounting for 39.93s, 64.17% of 62.23s total
Dropped 154 nodes (cum <= 0.31s)
Showing top 10 nodes out of 83
      flat  flat%   sum%        cum   cum%
     8.50s 13.66% 13.66%      9.99s 16.05%  runtime.findObject
     7.41s 11.91% 25.57%     13.93s 22.38%  runtime.scanobject
     5.38s  8.65% 34.21%      6.27s 10.08%  runtime.mapaccess1_fast64
     4.87s  7.83% 42.04%     44.51s 71.52%  havlakloopfinder.FindLoops
     3.40s  5.46% 47.50%     16.68s 26.80%  runtime.mallocgc
     2.43s  3.90% 51.41%      3.21s  5.16%  runtime.heapBitsSetType
     2.35s  3.78% 55.18%     11.03s 17.72%  runtime.gcWriteBarrier
     2.20s  3.54% 58.72%      7.86s 12.63%  runtime.mapassign_fast64ptr
     1.89s  3.04% 61.75%      9.29s 14.93%  runtime.wbBufFlush1
     1.50s  2.41% 64.17%      2.08s  3.34%  runtime.spanO
开启CPU Profile,Go程序每10ms会记录一个当前运行goroutine栈的计数器组成的样本,输出各列含义如下:
- flag: 采样时,该函数正在运行的次数 * 采样频率(10ms),即估算的函数运行时间,此时间不包括等待被调函数返回;
- flag%:flag / 总采样时间
- sum%:前面所有行flat%的累加值,如第二行sum% = 25.57% = 13.66% + 11.91%
- cum:采样时,该函数出现在调用栈的采样时间,包括等待被调函数返回
- cum%:cum / 总采样时间
使用-cum参数按照第四第五列排序:
(pprof) top5 -cum
Showing nodes accounting for 4.93s, 7.92% of 62.23s total
Dropped 154 nodes (cum <= 0.31s)
Showing top 5 nodes out of 83
      flat  flat%   sum%        cum   cum%
         0     0%     0%     44.99s 72.30%  main.main
         0     0%     0%     44.99s 72.30%  runtime.main
         0     0%     0%     44.51s 71.52%  havlakloopfinder.FindHavlakLoops
     4.87s  7.83%  7.83%     44.51s 71.52%  havlakloopfinder.FindLoops
     0.06s 0.096%  7.92%     24.92s 40.04%  runtime.systemstack
事实上,main.main和havlakloopfinder.FindLoops的总数应该是100%,但是每个栈样本仅包含栈底100帧。约30%的样本,递归函数havlakloopfinder.DFS深度(相比main.main)超过100帧,因此完整的trace被截断。
如果安装了graphviz,web命令可以生成SVG格式的图形Profile,并且用浏览器打开:
(pprof) web
也可以生成pdf格式的Profile:
(pprof) pdf
不用交互式:
go tool pprof -pdf ./havlak1 ./havlak1.prof > cpu.pdf
图形化Profile结果如下图:
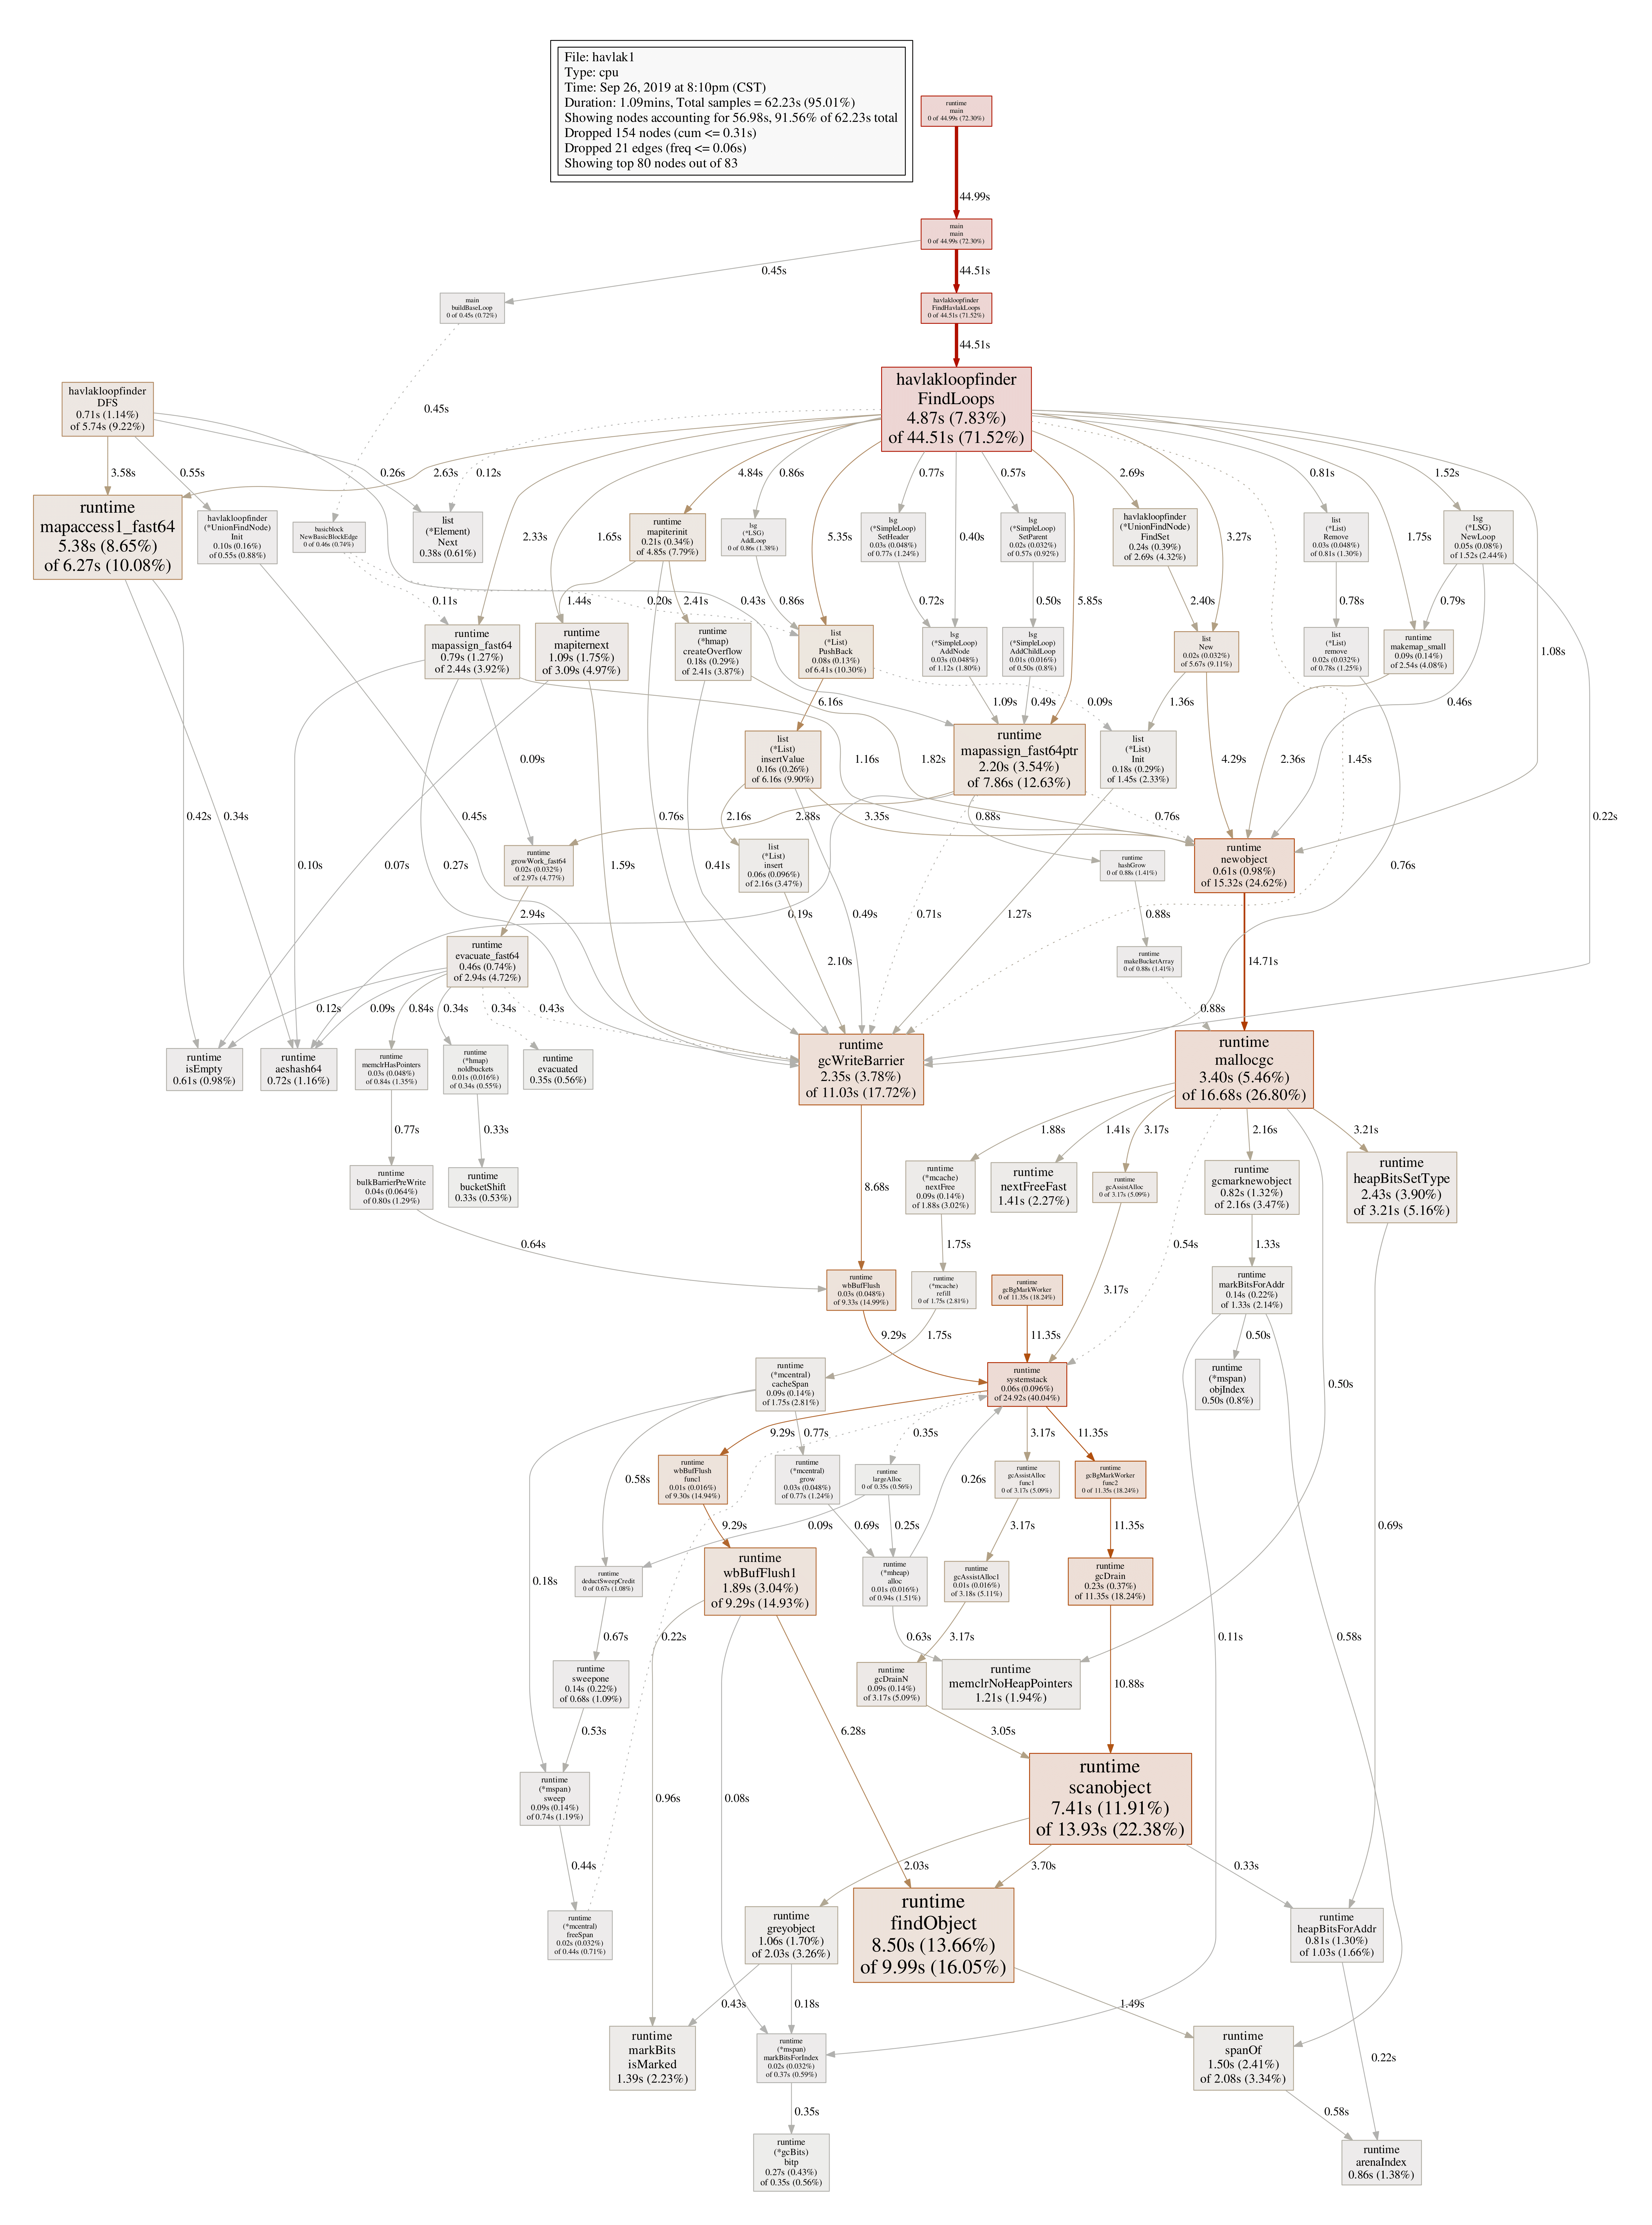
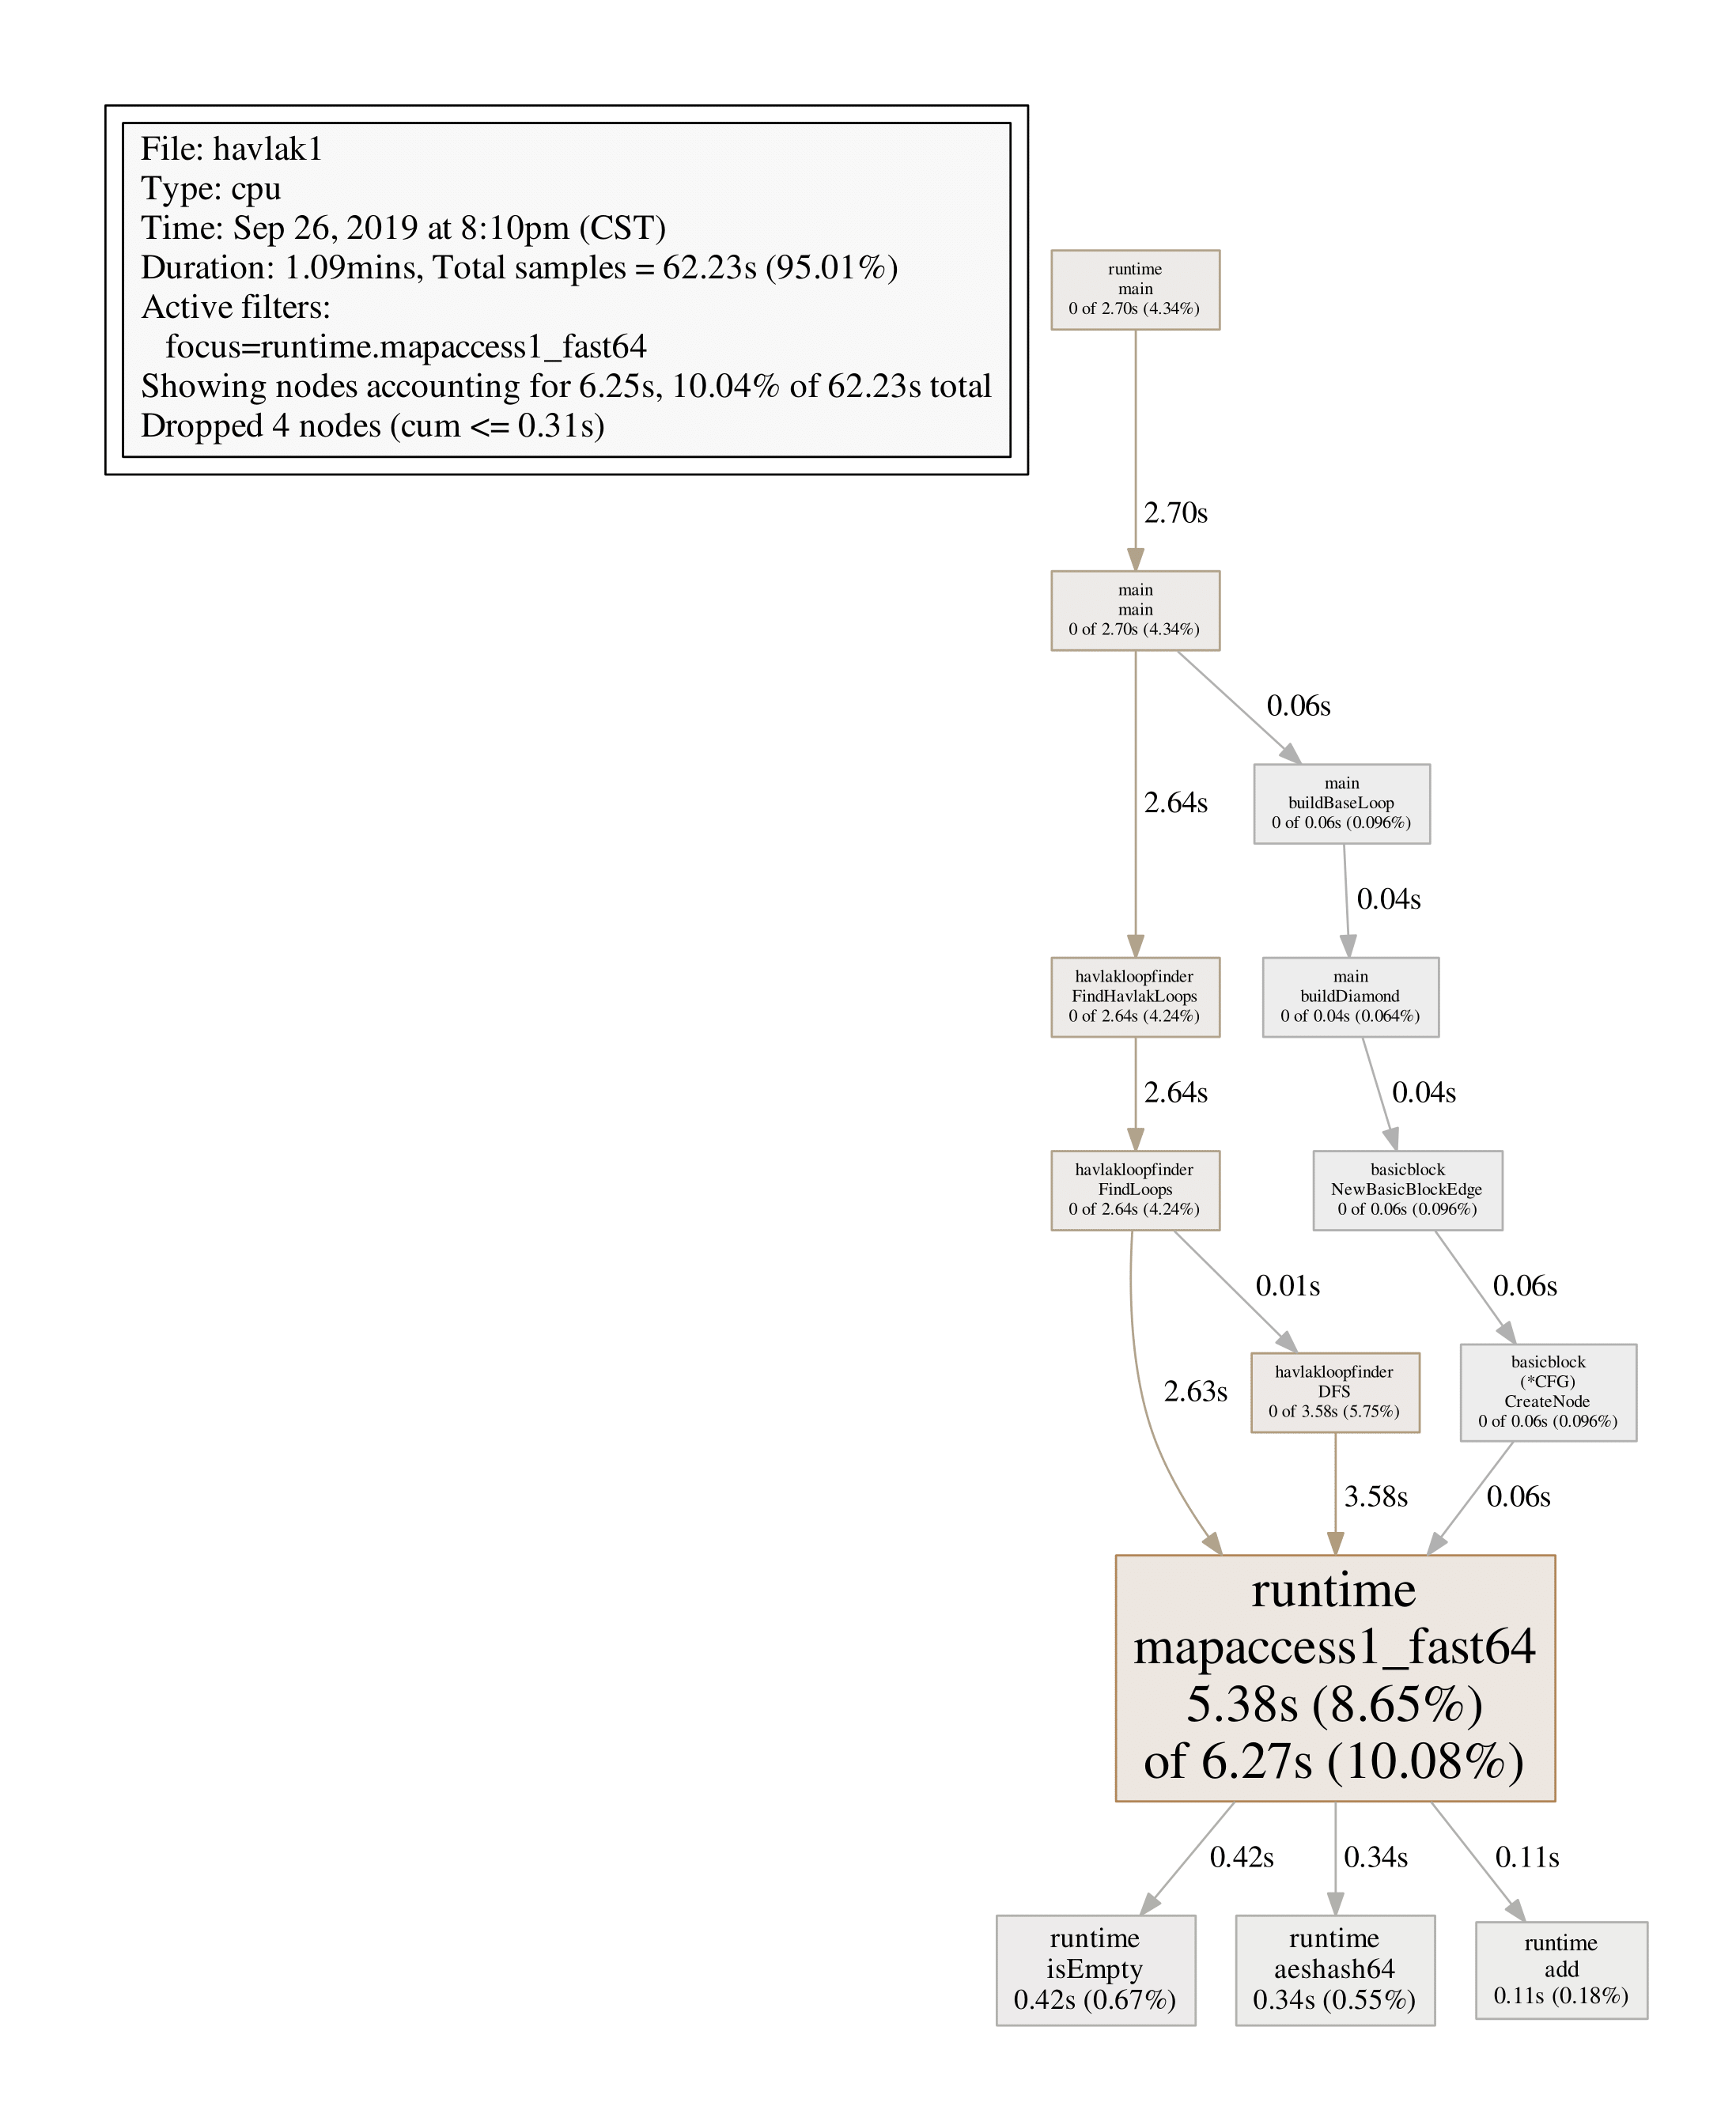
每个方框对应一个函数,方框大小和函数运行采样时间一致,X到Y的边表示X调用Y,边上的数字为调用时间。分析发现,mapaccess1_fast64占用CPU采样时间最多,我们可以用web或pdf命令Profile指定的函数:
(pprof) web runtime.mapaccess1_fast64
(pprof) pdf runtime.mapaccess1_fast64
list FuncName可以显示函数名以及每行代码的采样分析:
(pprof) list havlakloopfinder.DFS
Total: 1.04mins
ROUTINE ======================== havlakloopfinder.DFS in /root/go/src/havlakloopfinder/havlakloopfinder.go
     710ms     11.37s (flat, cum) 18.27% of Total
         .          .    153:    return false
         .          .    154:}
         .          .    155:
         .          .    156:// DFS - Depth-First-Search and node numbering.
         .          .    157://
      20ms       20ms    158:func DFS(currentNode *cfg.BasicBlock, nodes []*UnionFindNode, number map[*cfg.BasicBlock]int, last []int, current int) int {
      10ms      560ms    159:    nodes[current].Init(currentNode, current)
      20ms      450ms    160:    number[currentNode] = current
         .          .    161:
         .          .    162:    lastid := current
      70ms      540ms    163:    for ll := currentNode.OutEdges().Front(); ll != nil; ll = ll.Next() {
     370ms         3s    164:        if target := ll.Value.(*cfg.BasicBlock); number[target] == unvisited {
     110ms      5.74s    165:            lastid = DFS(target, nodes, number, last, lastid+1)
         .          .    166:        }
         .          .    167:    }
      90ms      1.04s    168:    last[number[currentNode]] = lastid
      20ms       20ms    169:    return lastid
         .          .    170:}
         .          .    171:
         .          .    172:// FindLoops
         .          .    173://
         .          .    174:// Find loops and build loop forest using Havlak's algorithm, which
disasm显示函数的汇编代码:
(pprof) disasm havlakloopfinder.DFS
除递归DFS调用外,160/164/168行表明number map的访问消耗了大量时间,我们可以用slice []int优化。
2.2 memprofile
优化之后可以看到,main.DFS不再出现在profile中,且其余部分的运行时间也降低了。现在程序在分配内存和GC上消耗了大量时间(runtime.mallocgc分配内存以及周期性地GC,占用了26.8%的时间),为了找出为什么GC运行如此之多,我们需要找出哪个函数在分配内存。这里给程序添加内存profile,如果带有-memprofile命令行参数,则程序在一次循环查找迭代后停止,写内存profile文件,然后退出:
var memprofile = flag.String("memprofile", "", "write cpu profile to file")
func main() {
    flag.Parse()
...
for i := 0; i < 50; i++ {
        fmt.Printf(".")
        havlakloopfinder.FindHavlakLoops(cfgraph, lsg.NewLSG())

        if *memprofile != "" {
            f, err := os.Create(*memprofile)
            if err != nil {
                log.Fatal(err)
            }
            pprof.WriteHeapProfile(f)
            f.Close()
            return
        }
    }
执行命令:
./havlak2 -memprofile=havlak2.mprof
go tool pprof havlak2 havlak2.mprof
File: havlak2
Type: inuse_space
Time: Sep 26, 2019 at 11:31pm (CST)
Entering interactive mode (type "help" for commands, "o" for options)
(pprof) top5
Showing nodes accounting for 221.97MB, 94.44% of 235.03MB total
Showing top 5 nodes out of 21
      flat  flat%   sum%        cum   cum%
   85.46MB 36.36% 36.36%   167.97MB 71.46%  havlakloopfinder.FindLoops
   60.50MB 25.74% 62.10%    60.50MB 25.74%  container/list.(*List).insertValue
      35MB 14.89% 77.00%       35MB 14.89%  container/list.New
   28.50MB 12.13% 89.12%    28.50MB 12.13%  basicblock.NewBasicBlock
   12.50MB  5.32% 94.44%    12.50MB  5.32%  lsg.(*LSG).NewLoop
为减少开销,内存Profiler仅记录分配的每半兆字节大约一个块的信息(采样率1-in-524288)。FindLoops分配了大约85.46MB内存,
(pprof) list FindLoops
         .          .    230:
         .          .    231:        if nodeW.NumPred() > 0 {
         .          .    232:            for ll := nodeW.InEdges().Front(); ll != nil; ll = ll.Next() {
         .          .    233:                nodeV := ll.Value.(*cfg.BasicBlock)
         .          .    234:                v := number[nodeV]
         .          .    235:                if v == unvisited {
         .          .    236:                    continue // dead node
         .          .    237:                }
         .          .    238:
         .          .    239:                if isAncestor(w, v, last) {
  512.01kB        2MB    240:                    backPreds[w].PushBack(v)
         .          .    241:                } else {
   22.50MB    22.50MB    242:                    nonBackPreds[w][v] = true
         .          .    243:                }
         .          .    244:            }
         .          .    245:        }
         .          .    246:    }
可以看到,瓶颈仍然是map的使用,FindLoops分配了22.5MB的map。 如果go tool pprof带上参数--inuse_objects,则Profile将会记录内存分配计数:
go tool pprof --inuse_objects havlak2 havlak2.mprof
         .          .    230:
         .          .    231:        if nodeW.NumPred() > 0 {
         .          .    232:            for ll := nodeW.InEdges().Front(); ll != nil; ll = ll.Next() {
         .          .    233:                nodeV := ll.Value.(*cfg.BasicBlock)
         .          .    234:                v := number[nodeV]
         .          .    235:                if v == unvisited {
         .          .    236:                    continue // dead node
         .          .    237:                }
         .          .    238:
         .          .    239:                if isAncestor(w, v, last) {
     32768      65537    240:                    backPreds[w].PushBack(v)
         .          .    241:                } else {
    245782     245782    242:                    nonBackPreds[w][v] = true
         .          .    243:                }
         .          .    244:            }
         .          .    245:        }
         .          .    246:    }
这里只需要简单的set,但是却用了map存储,可以用slice优化。
再次查看CPU profile可以看到GC占用了大量时间,
./havlak3 -cpuprofile=havlak3.prof
go tool pprof ./havlak3 ./havlak3.prof
File: havlak3
Type: cpu
Time: Sep 28, 2019 at 10:30am (CST)
Duration: 1.02mins, Total samples = 1.01mins (98.87%)
Entering interactive mode (type "help" for commands, "o" for options)
(pprof) top5
Showing nodes accounting for 28.66s, 47.29% of 60.61s total
Dropped 163 nodes (cum <= 0.30s)
Showing top 5 nodes out of 82
      flat  flat%   sum%        cum   cum%
     8.53s 14.07% 14.07%      9.69s 15.99%  runtime.findObject
     6.87s 11.33% 25.41%     13.79s 22.75%  runtime.scanobject
     5.20s  8.58% 33.99%      5.90s  9.73%  runtime.mapaccess1_fast64
     4.63s  7.64% 41.63%     43.20s 71.28%  havlakloopfinder.FindLoops
     3.43s  5.66% 47.29%     16.05s 26.48%  runtime.mallocgc
另一个查看GC为什么如此耗时的方法是,在mallocgc中找到导致GC的最耗时的内存分配:
(pprof) web mallocgc
(pprof) pdf mallocgc

由于存在很多运行时间很少的结点,生成的图形结果比较复杂,很难发现线索,可以用--nodefraction参数过滤,比如仅显示运行时间不小于10%的结点:
go tool pprof --nodefraction=0.1 ./havlak3 ./havlak3.prof
(pprof) pdf mallocgc
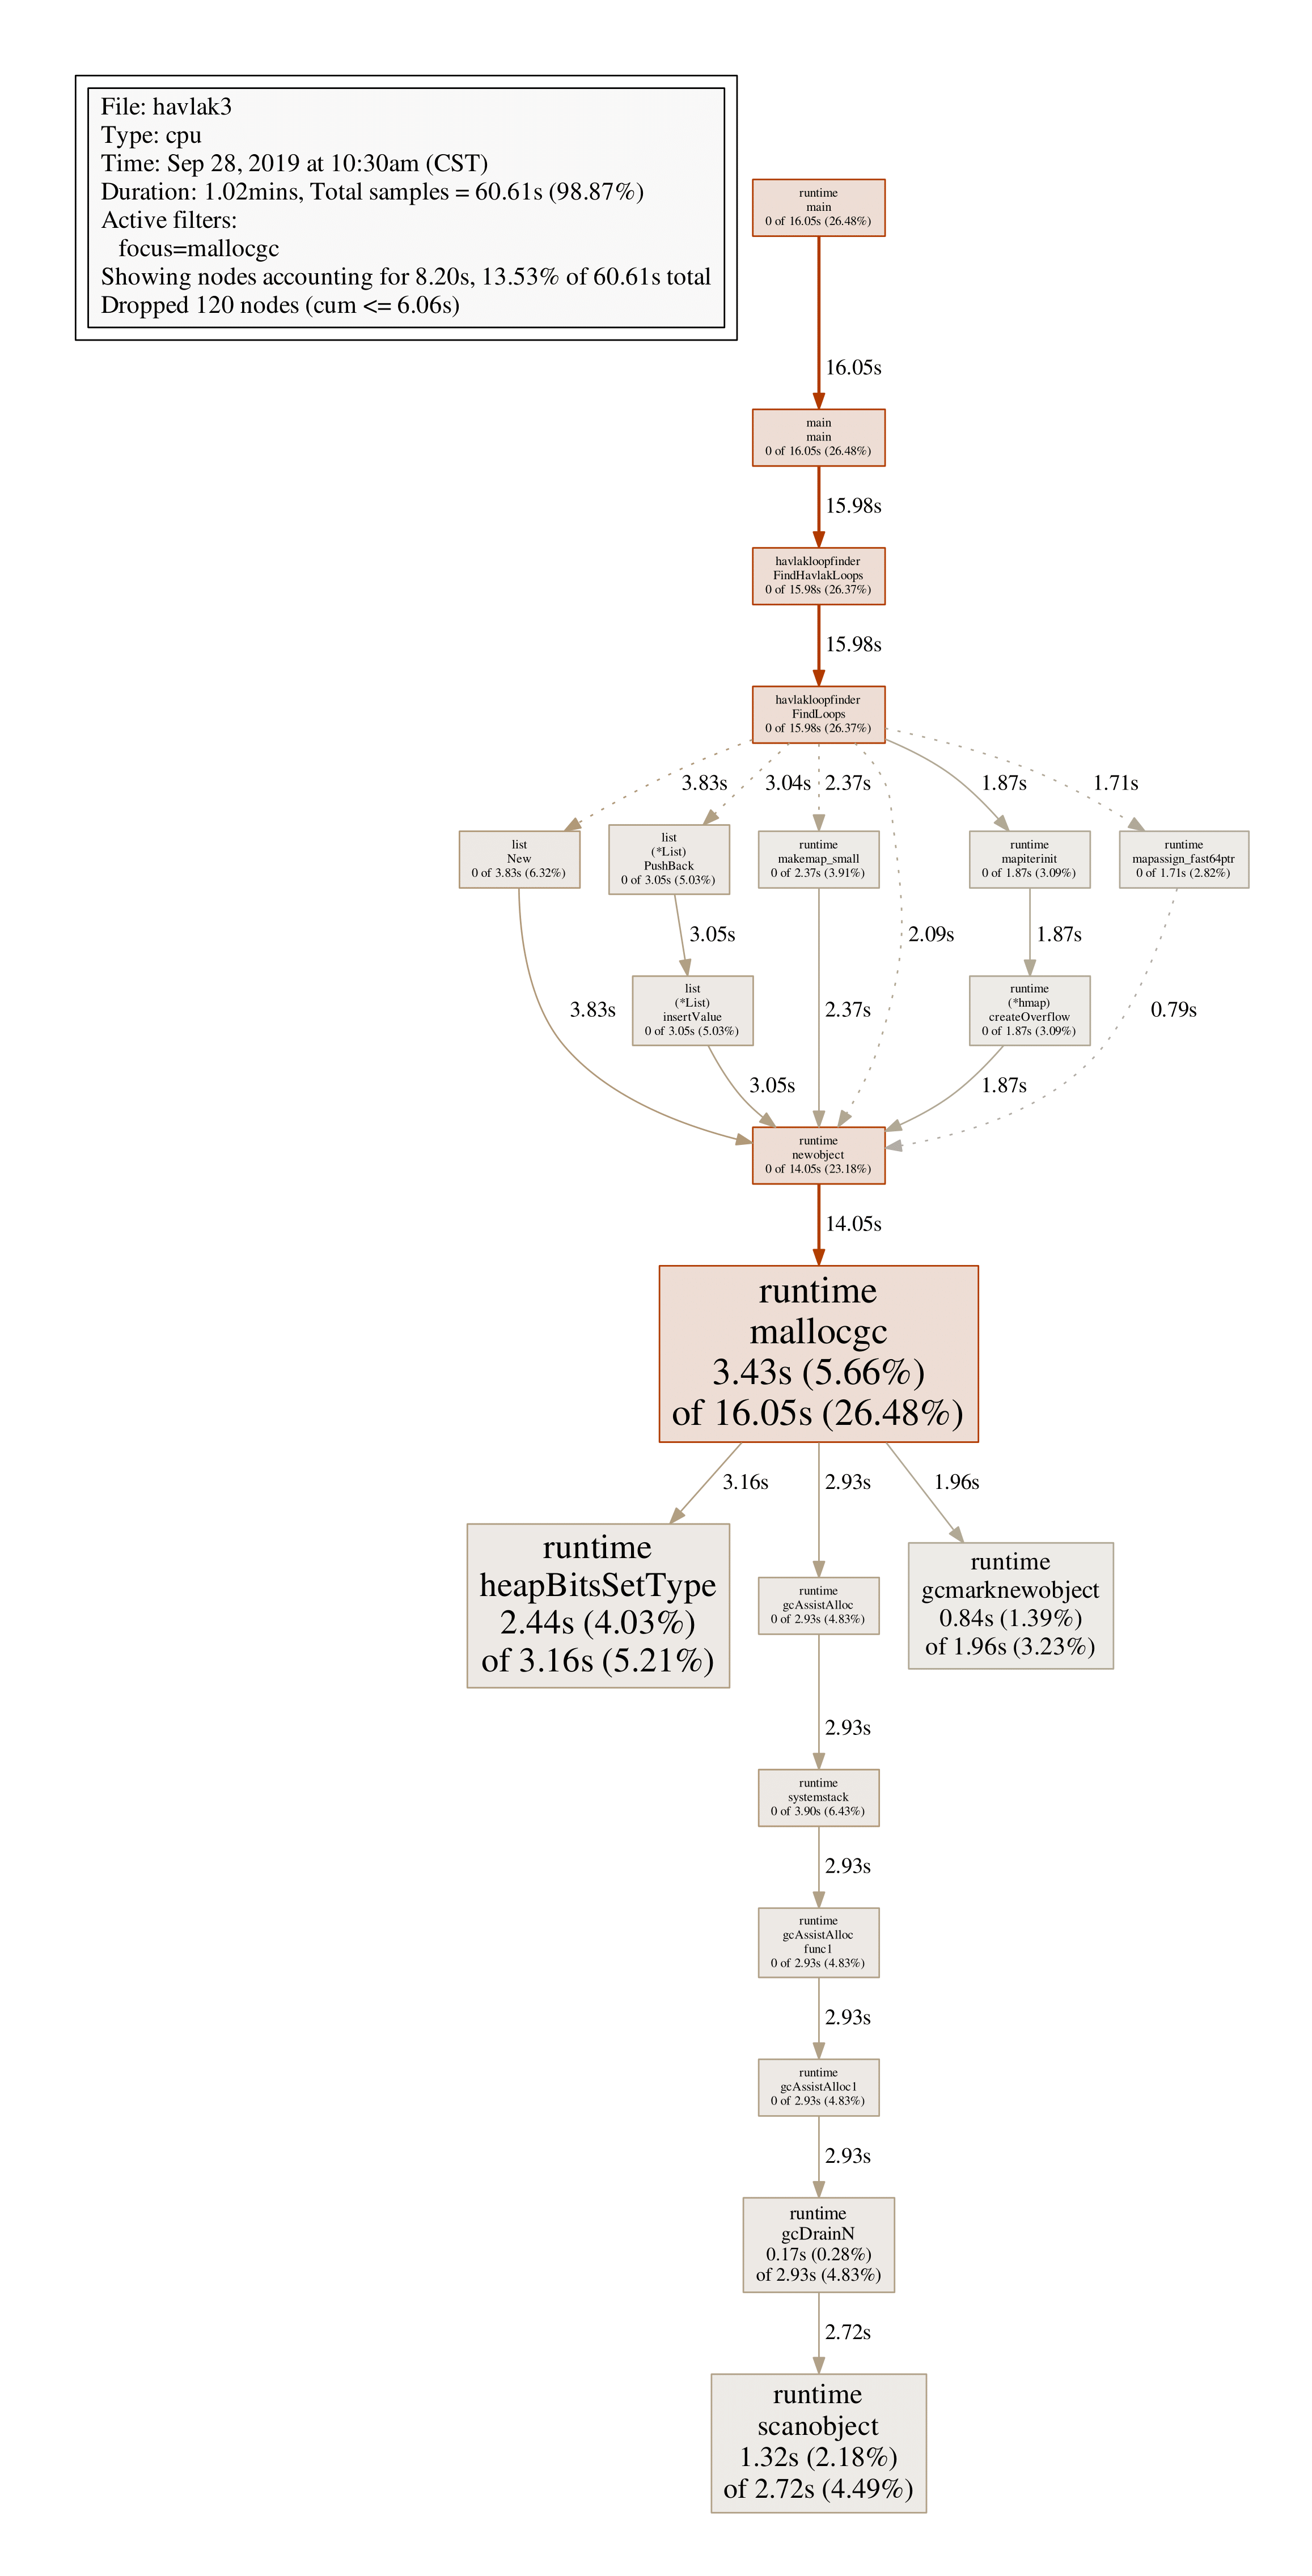
沿着粗线箭头可以看到,FindLoops是导致GC的主要原因,list FindLoops可以发现每次FindLoops调用会分配大量结构体,可以用一个全局结构体优化(工程不推荐,也非线程安全)。
2.3 blockprofile
Block profile显示导致阻塞同步原语(mutex channel)的函数调用,开启此功能需要在main或者init函数中用runtime.SetBlockProfileRate设置profile速率。
var mutex sync.Mutex

func worker(wg * sync.WaitGroup) {
    defer wg.Done()
    mutex.Lock()
    time.Sleep(1 * time.Millisecond)
    mutex.Unlock()
}

func main()  {
    // rate = 1 时, 统计所有的 block event,
    // rate <=0 时,则关闭block profiling
    // rate > 1 时,为 ns 数,阻塞时间t>rate的event 一定会被统计,小于rate则有t/rate 的几率被统计
    // 参考 https://github.com/golang/go/blob/release-branch.go1.9/src/runtime/mprof.go#L397

    runtime.SetBlockProfileRate(1 * 1000 * 1000)
    var wg sync.WaitGroup

    wg.Add(1)
    mutex.Lock()

    go worker(&wg)
    time.Sleep(2 * time.Millisecond)

    mutex.Unlock()
    wg.Wait()

    p := pprof.Lookup("block")
    if p == nil {
        fmt.Errorf("block prof not found")
        return
    }
    f, err := os.Create("block.prof")
    if err != nil {
        fmt.Errorf("%v", err.Error())
        return
    }
    defer f.Close()
    err = p.WriteTo(f, 0)
    if err != nil {
        fmt.Errorf("%v", err.Error())
        return
    }
}

go build -o bk b.go
./bk
go tool pprof bk block.prof
(pprof) top
Showing nodes accounting for 3.16ms, 100% of 3.16ms total
      flat  flat%   sum%        cum   cum%
    2.04ms 64.43% 64.43%     2.04ms 64.43%  sync.(*Mutex).Lock
    1.12ms 35.57%   100%     1.12ms 35.57%  sync.(*WaitGroup).Wait
         0     0%   100%     1.12ms 35.57%  main.main
         0     0%   100%     2.04ms 64.43%  main.worker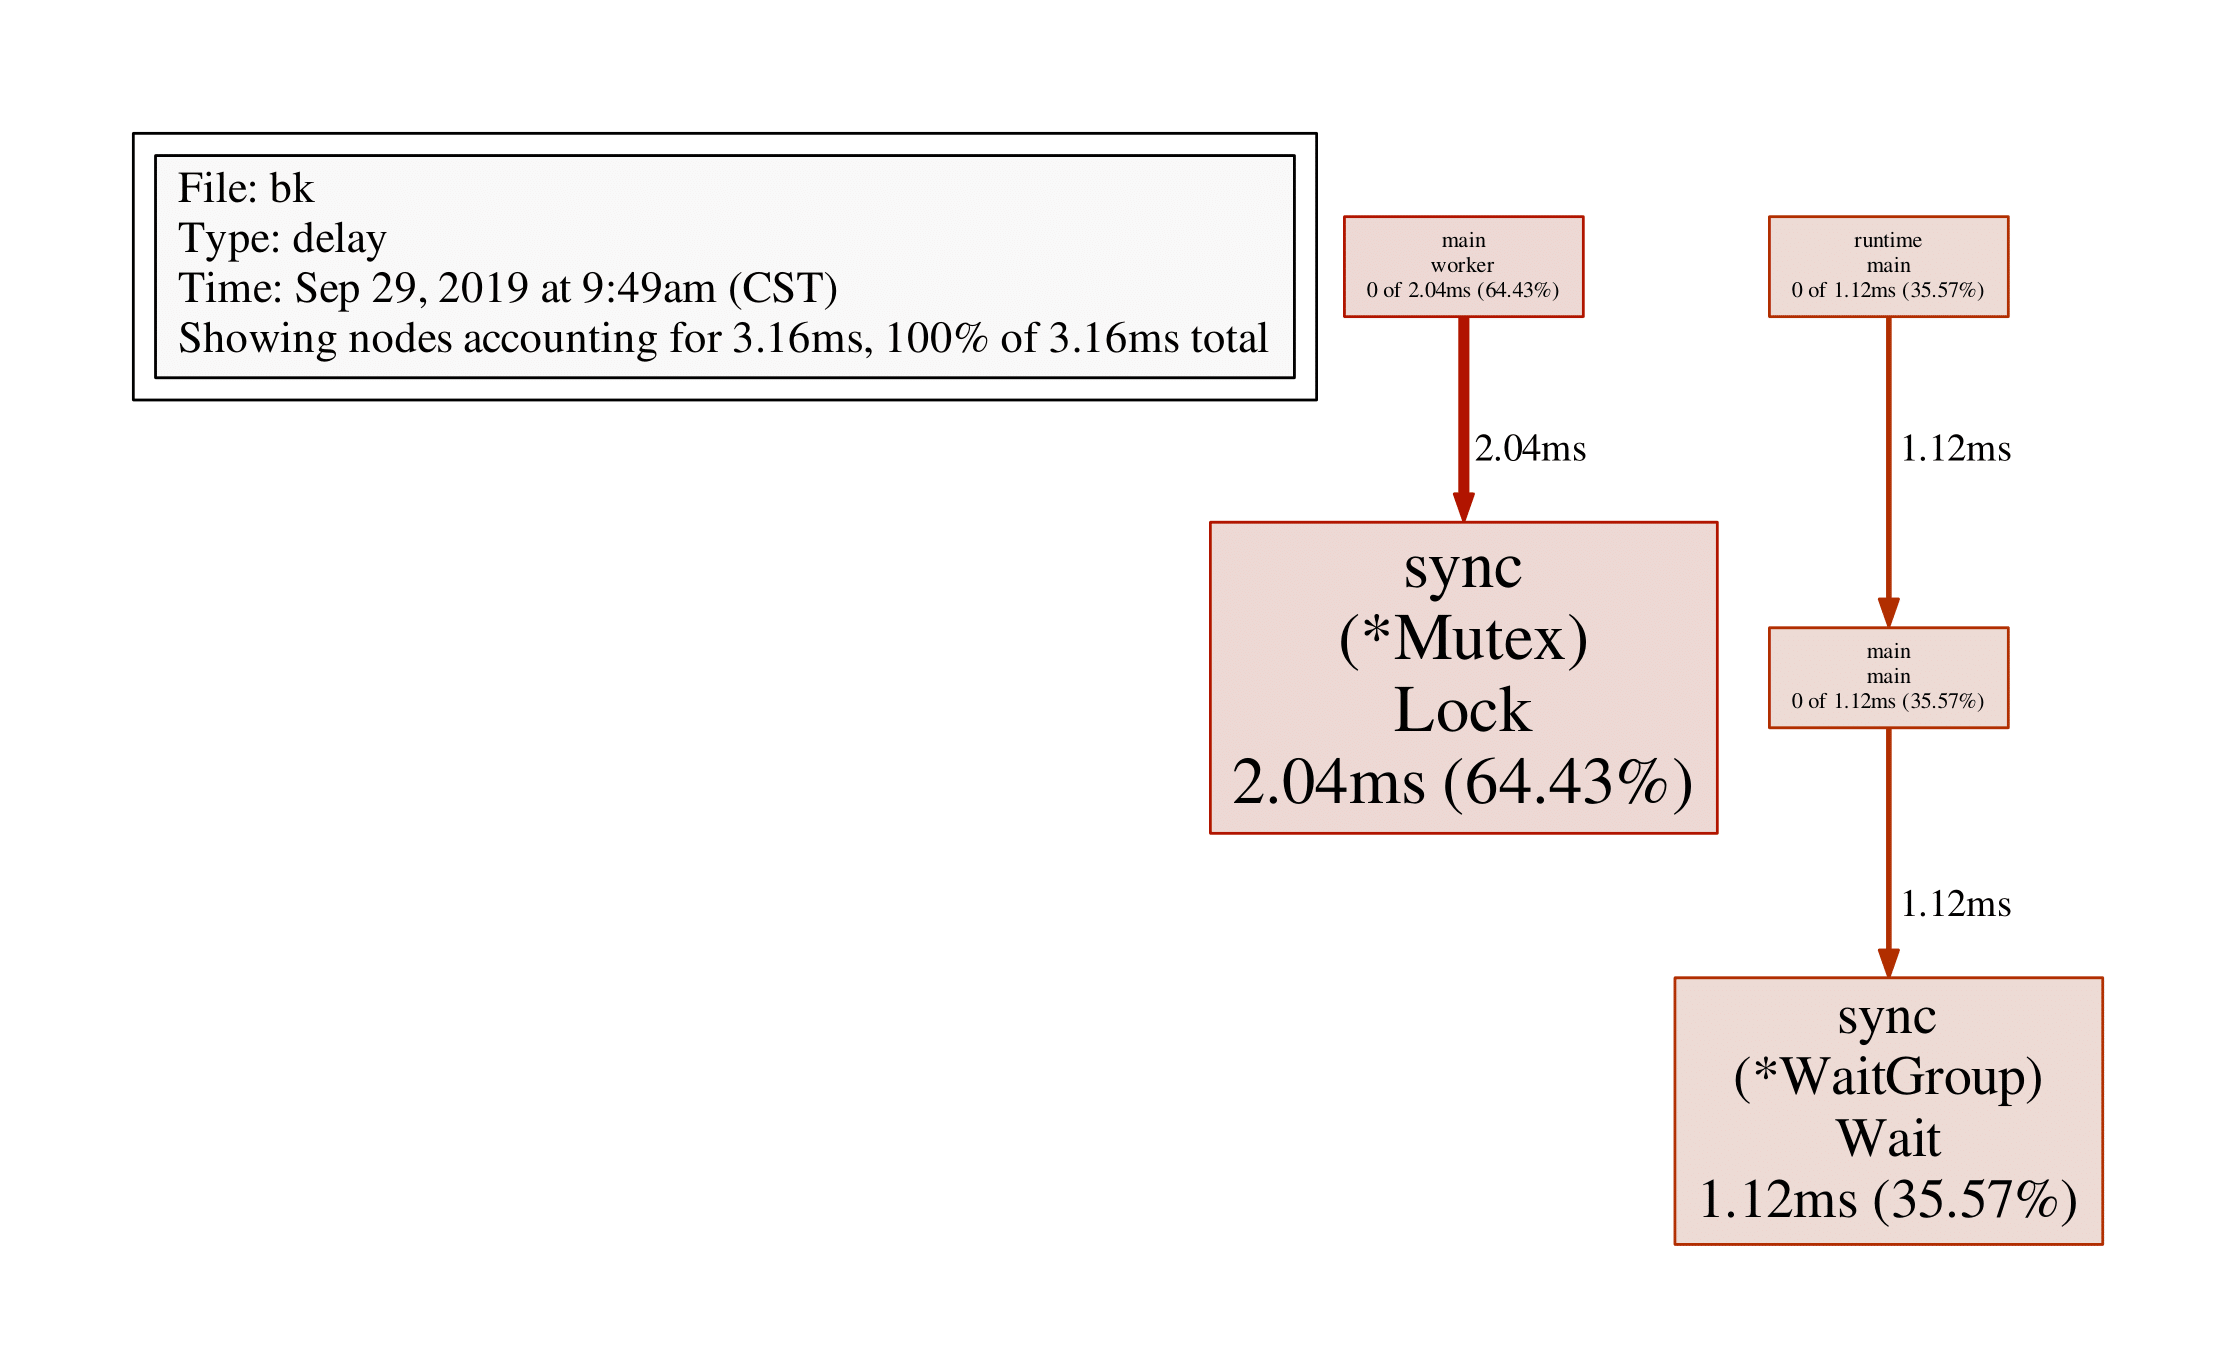
0 0% 100% 1.12ms 35.57% runtime.main可以看到sync.(Mutex).Lock阻塞了2.04ms,sync.(WaitGroup).Wait阻塞了1.12ms,即main函数阻塞了2.04ms,worker函数阻塞了1.12ms,通过web/pdf命令查看:
(pprof) pdf
3.4 mutexprofile
var mutex sync.Mutex
func worker(wg * sync.WaitGroup) {
defer wg.Done()
mutex.Lock()
time.Sleep(1 * time.Millisecond)
mutex.Unlock()
}
func main() {
// 当 rate = 0 时,关闭 mutex prof (默认值)
// 当 rate = 1 时,表示记录所有的 mutex event
// 当 rate > 1 时,记录 1/rate 的 mutex event(随机)
runtime.SetMutexProfileFraction(1)
var wg sync.WaitGroup
wg.Add(1)
mutex.Lock()
go worker(&wg)
time.Sleep(2 * time.Millisecond)
mutex.Unlock()
wg.Wait()
p := pprof.Lookup("mutex")
if p == nil {
fmt.Errorf("block prof not found")
return
}
f, err := os.Create("mutex.prof")
if err != nil {
fmt.Errorf("%v", err.Error())
return
}
defer f.Close()
err = p.WriteTo(f, 0)
if err != nil {
fmt.Errorf("%v", err.Error())
return
}
}
go build -o mx m.go
./mx
go tool pprof ./mx mutex.prof
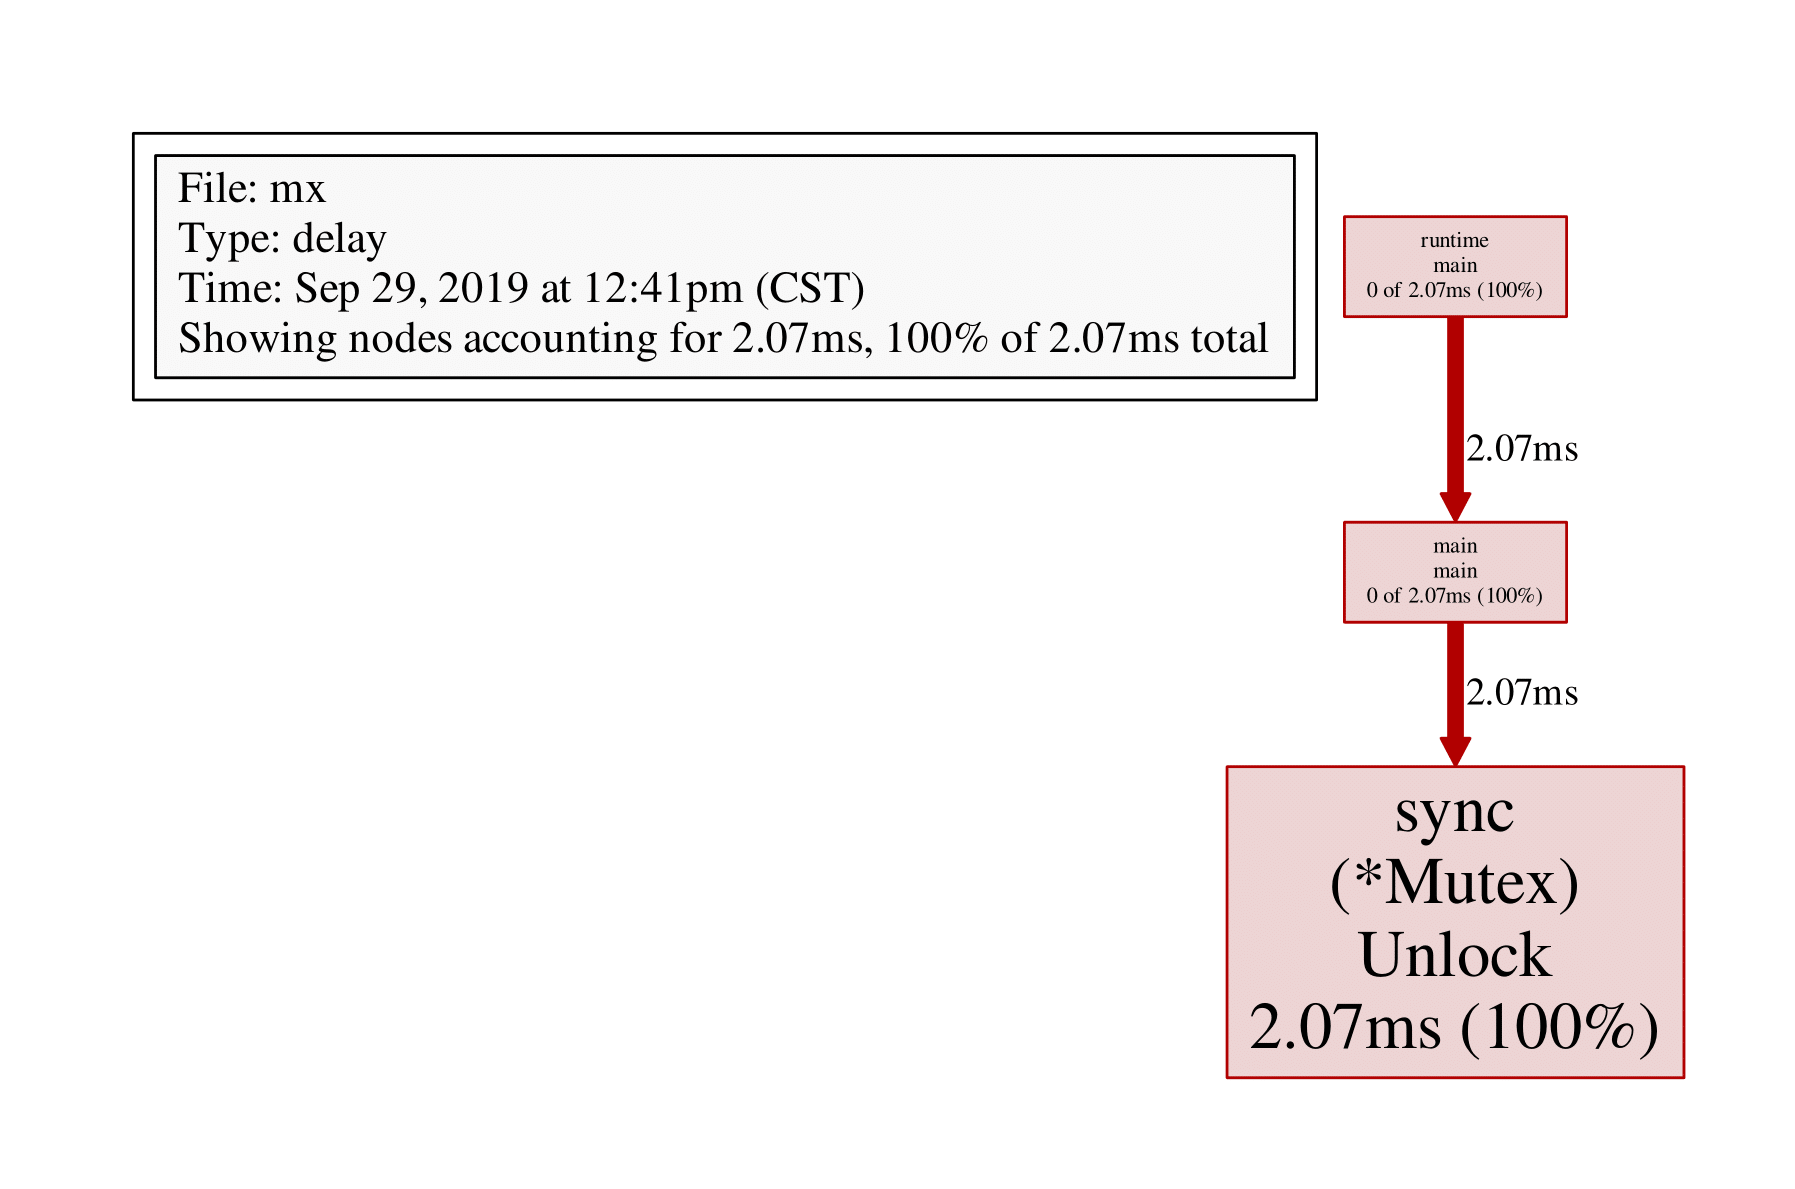
File: mx
Type: delay
Time: Sep 29, 2019 at 12:41pm (CST)
Entering interactive mode (type "help" for commands, "o" for options)
(pprof) top
Showing nodes accounting for 2.07ms, 100% of 2.07ms total
flat flat% sum% cum cum%
2.07ms 100% 100% 2.07ms 100% sync.(*Mutex).Unlock
0 0% 100% 2.07ms 100% main.main
0 0% 100% 2.07ms 100% runtime.main
(pprof) pdf结果如下:
3 net/http/pprof
在应用程序中导入import _ "net/http/pprof",并启动http server即可:
package data

var datas []string

func Add(str string) string {
    data := []byte(str)
    sData := string(data)
    datas = append(datas, sData)

    return sData
}

//////////////////////////////////////////////////////////////

package main

import (
    "data"
    "log"
    "net/http"
    _"net/http/pprof"
    "time"
)

func main() {
    go func() {
        for {
            log.Println(data.Add("https://github.com/EDDYCJY"))
            time.Sleep(time.Duration(1) * time.Second)
        }
    }()

    http.ListenAndServe("0.0.0.0:6060", nil)
}
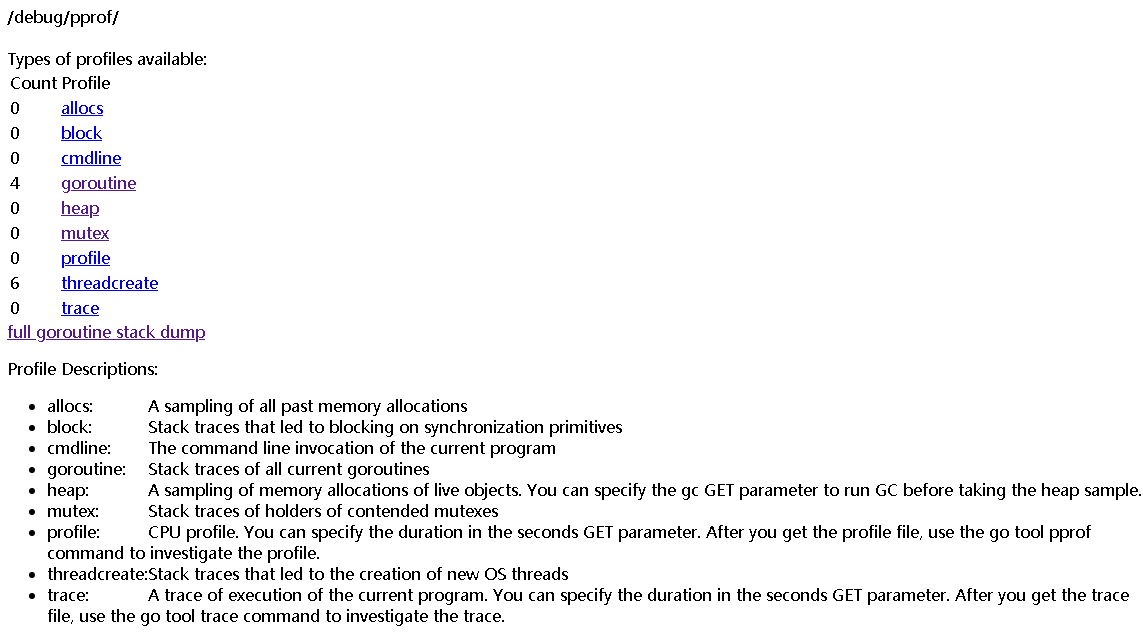
之后可以通过http://localhost:6060/debug/pprof/CMD获取对应的采样数据,支持的CMD有:
- goroutine:获取程序当前所有goroutine的堆栈信息
- heap:包含每个goroutine分配大小,分配堆栈等,每分配runtime.MemProfileRate(默认512K)个字节进行一次数据采样
- threadcreate:获取导致创建OS线程的goroutine堆栈
- block:获取导致阻塞的goroutine堆栈(如channel,mutex等),使用前需要先调用runtime.SetBlockProfileRate
- mutex:获取导致mutex争用的goroutine堆栈,使用前需要先调用runtime.SetMutexProfileFraction
以上五个CMD都通过runtime/pprof Profile结构体统一管理,以Lookup提供统一查询接口,有相似的返回值(goroutine堆栈),它们都支持一个debug URL参数,默认为0,此时返回的采样数据是不可人为解读的函数地址列表,需要结合pprof工具才能还原函数名字;debug=1时,会将函数地址转换为函数名,即脱离pprof在浏览器中直接查看,对goroutine的CMD来说,还支持debug=2参数,此时将以unrecovered panic的格式打印堆栈,可读性更高。
以上几种Profile可在http://localhost:6060/debug/pprof/中看到,除此之外go pprof的CMD还包括:
- cmdline:获取程序的命令行启动参数
- profile:获取指定时间内(从请求开始)的cpuprofile,倒计时结束后自动返回。 参数:seconds,默认值30秒,CPU profile每秒钟采样100次,收集当前运行的goroutine堆栈信息
- symbol:用于将地址列表转换为函数名列表,地址通过'+'分隔,如URL/debug/pprof?0x18d067f+0x17933e7
- trace:对应用程序进行执行追踪,参数:seconds,默认值1s
这几个CMD因为各种原因没有整合到Profile结构中,但就使用上而言没有区别。 如访问http://localhost:6060/debug/pprof/或者http://132.232.51.227:6060/debug/pprof/
使用net/http/pprof,go tool pprof可直接跟URL:
go tool pprof http://localhost:6060/debug/pprof/profile
go tool pprof --seconds 25 http://localhost:6060/debug/pprof/profile
Fetching profile over HTTP from http://localhost:6060/debug/pprof/profile
Saved profile in /root/pprof/pprof.pp.samples.cpu.004.pb.gz
File: pp
Type: cpu
Time: Sep 29, 2019 at 11:42pm (CST)
Duration: 30s, Total samples = 0
No samples were found with the default sample value type.
Try "sample_index" command to analyze different sample values.
Entering interactive mode (type "help" for commands, "o" for options)
会生成pprof.pp.samples.cpu.004.pb.gz文件。
4 go test
通过runtime/pprof对应用整体分析找出问题点后,再用go test进行基准测试,进一步确定热点,加以优化并对比测试。下面是一个对package data测试的例子:
d.go源码文件如下:
package data

var datas []string

func Add(str string) string {
    data := []byte(str)
    sData := string(data)
    datas = append(datas, sData)

    return sData
}
d_test.go源码文件如下:
package data

import (
    "strconv"
    "testing"
)

func TestAdd(t *testing.T) {
    t.Log(Add("hello"))
}

func BenchmarkAdd(b *testing.B) {
    for i := 0; i < b.N; i++ {
        s := strconv.Itoa(i)
        Add("world " + s)
    }
}
4.1 单元测试
执行单元测试:
go test d_test.go d.go -v
指定测试函数:
go test d_test.go d.go -run='TestAdd' -v
=== RUN   TestAdd
--- PASS: TestAdd (0.00s)
    d_test.go:9: hello
goos: linux
goarch: amd64
BenchmarkAdd      2586132           499 ns/op
PASS
ok      command-line-arguments    1.851s
4.2 基准测试
执行基准测试:
go test -v -bench=. d_test.go d.go
-bench=.表示运行d_test.go文件里的所有基准测试,和单元测试的-run类似,BenchmarkAdd运行了2586132次,也就是testing.B结构中提供给程序的N,499ns/op表示每一个操作的耗费时间。windows下使用go test命令时,-bench=.应该写为-bench="."。
4.3 基准测试原理
基准测试框架对一个测试用例的默认测试时间是1秒,开始测试时,若Benmark开头的基准测试用例函数返回不到1秒,那么testing.B中的N值将按1,2,5,10,20,50......递增,同时以递增后的值重新调用基准测试用例函数。
自定义基准测试时间:
通过-benchtime参数可以自定义测试时间:
go test -v -bench=. -benchtime=5s d_test.go d.go
=== RUN   TestAdd
--- PASS: TestAdd (0.00s)
    d_test.go:9: hello
goos: linux
goarch: amd64
BenchmarkAdd      5696103           472 ns/op
PASS
ok      command-line-arguments    3.214s
4.4 内存测试
基准测试可以对一段代码可能存在的内存分配进行统计,在命令行参数中添加-benchmem参数以显示内存分配情况:
go test -v -bench=Add -benchmem d_test.go d.go
=== RUN   TestAdd
--- PASS: TestAdd (0.00s)
    d_test.go:9: hello
goos: linux
goarch: amd64
BenchmarkAdd      2697740           536 ns/op         116 B/op           1 allocs/op
PASS
ok      command-line-arguments    2.087s
-bench=Add,指定测试BenchmarkAdd函数;
116B/op表示每会一次调用需要分配116个字节,1 allocs/op表示每一次调用有两次分配,可以根据这些信息迅速找到问题分配点,从而进行优化和调整。
4.5 控制计时器
有些测试需要一定的启动和初始化时间,如果从BenchmarkXXX()函数开始计时会很大程度上影响测试结果的精准性。testing.B提供了一系列的方法可以方便地控制计时器,从而让计时器只在需要的区间进行测试:
func BenchmarkAdd(b *testing.B){
    //重置计时器
    b.ResetTimer()
    //停止计时器
    b.StopTimer()
    //开始计时器
    b.StartTimer()
}
从Benchmark函数开始,timer就开始计数,StopTimer()可以停止这个计数过程,做一些耗时的操作,通过StartTimer()重新开始计时,ResetTimer()可以重置计数器的数据。计数器内部不仅包含耗时数据,还包括内存分配的数据。
4.6 go test采样
方法1:
首先生成pprof需要用到的二进制文件:
go test -c d_test.go d.go -o MyTest
执行基准测试,并忽略任何单元测试,test flag前面需要加上'test.'前缀:
./MyTest -test.bench BenchmarkAdd -test.run XXX -test.cpuprofile cpu.prof
方法2:
go test -bench BenchmarkAdd -run XXX -cpuprofile=cpu.prof .
go test可以直接加-cpuprofile/-mutexprofilefraction等参数实现pprof数据的采样和生成,如:
go test -bench BenchmarkAdd -run XXX -mutexprofilefraction=1 -mutexprofile=mutex.prof
具体参见go help test。
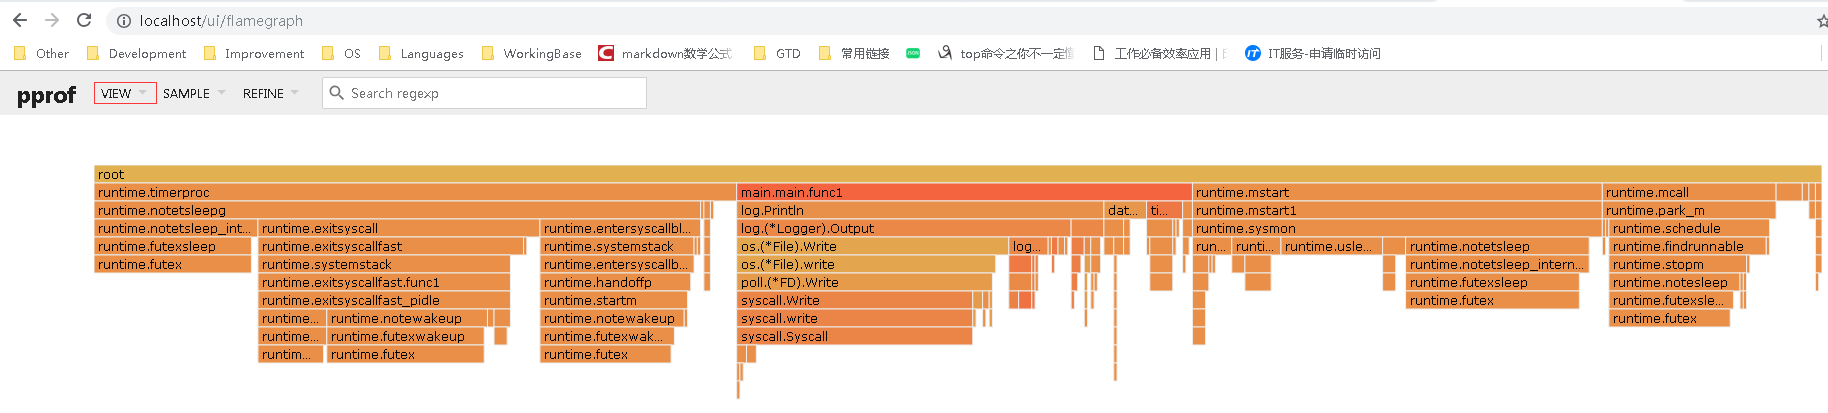
5 火焰图
windows安装graphviz,将其bin目录添加至系统环境变量PATH;
内网服务监听标准Web端口(80/8080/8081/443);
方法1: 在windows MinGW或CMD窗口执行命令:go tool pprof -http=:8080 http://localhost:8081/debug/pprof/profile,**备注**:go tool pprof -http=:8080 http://100.94.6.138:8081/debug/pprof/profile用外网IP(132.232.51.227)由于开发网和IDC网络策略一直无法连接成功
默认取样时间为30s,可以通过-seconds指定采样时间:
go tool pprof -http=:8080 -seconds=300 http://100.94.6.138:8081/debug/pprof/profile
go tool pprof -http=:8080 http://100.94.6.138:8081/debug/pprof/profile?seconds=300
对于trace分析可以直接执行:
go tool trace trace.out
方法2: 在linux服务器执行:go tool pprof http://localhost:8081/debug/pprof/profile,或者指定采样时间:go tool pprof -seconds=300 http://localhost:8081/debug/pprof/profile
Saved profile in /root/pprof/pprof.pp.samples.cpu.011.pb.gz
File: pp
Type: cpu
Time: Sep 30, 2019 at 12:49am (CST)
Duration: 30s, Total samples = 0
No samples were found with the default sample value type.
Try "sample_index" command to analyze different sample values.
Entering interactive mode (type "help" for commands, "o" for options)
将/root/pprof/pprof.pp.samples.cpu.011.pb.gz保存至windows,在windows CMD或者MinGW窗口执行:go tool pprof -http=:8090 pprof.pp.samples.cpu.011.pb.gz自动打开浏览器。
如果有prof文件,则执行:go tool pprof -http=:8090 cpu.prof
方法3: 用wget先下载profile文件:wget http://100.94.6.138:8081/debug/pprof/profile -O cpu.prof,或者指定采样时间:wget http://100.94.6.138:8081/debug/pprof/profile?seconds=60 -O cpu.prof,再使用go tool pprof分析,windows CMD或MinGW窗口执行:go tool pprof -http=:8090 cpu.prof
转载请注明来源,欢迎对文章中的引用来源进行考证,欢迎指出任何有错误或不够清晰的表达。可以在下面评论区评论,也可以邮件至yj.mapple@gmail.com
文章标题:go pprof性能分析
文章字数:4.6k
本文作者:melonshell
发布时间:2019-09-25, 16:41:07
最后更新:2021-07-28, 12:53:22
原始链接:http://melonshell.github.io/2019/09/25/go3_pprof/版权声明: "署名-非商用-相同方式共享 4.0" 转载请保留原文链接及作者。

